How to Install Plumbing In a Shipping Container: 6 Steps

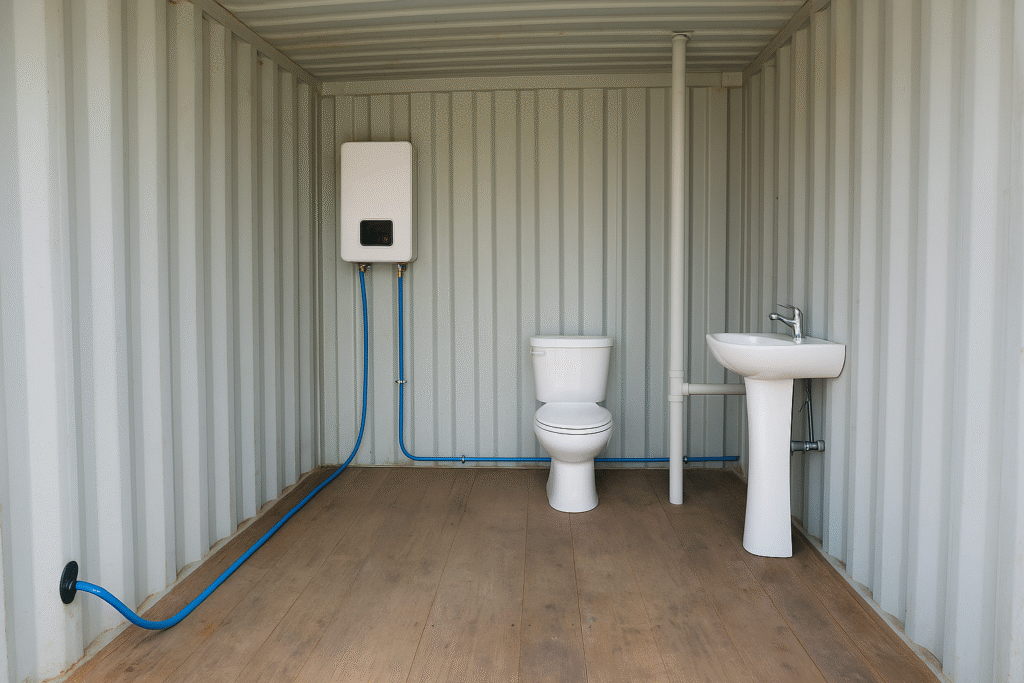
Shipping container homes are a unique and sustainable housing option. However, installing plumbing correctly in a shipping container is crucial for functionality and comfort. Before interior construction begins, you must plan how to put plumbing in a shipping container. Properly installed plumbing in shipping container homes ensures freshwater supply and wastewater removal.
When it comes to how to install plumbing in a shipping container, the system’s complexity depends on your needs. It may be as simple as a kitchen sink or as involved as full bathrooms. Proper planning and execution are key. The plumbing acts as the lifeline, efficiently bringing water in and removing waste. Laying the pipes and vents properly from the start avoids issues.
This guide will cover the planning stage to determine your specific plumbing needs for your shipping container home. We’ll look at the steps to correctly install the system before drywalling. With the proper preparation, you can have a functional, comfortable plumbing system in your unique container dwelling.

1. Pre-Planning: Understanding Your Needs
Before starting any plumbing work for your shipping container home, you must understand the needs of your container dwelling. Will it be a simple container office setup with a sink? Your container home floor plans might include an entire off-grid residential space requiring a kitchen, bathroom, laundry, and more.
Take stock of all the water uses like faucets, showers, toilets, washing machines, etc. Consider both hot and cold water needs. Water needs determine the supply lines, water heater requirements, drainage, and venting. Also, determine where existing water/sewer hookups are or if a well/septic is needed.
Some plumbing needs may require installing electricity in a shipping container. Make sure to plan for both before installing plumbing because redoing mistakes can be costly.
Measure the container dimensions and sketch a plumbing layout. Mark where piping and fixtures will go while maximizing space. Consider ease of installation and potential access needs for maintenance when planning how to put plumbing in a shipping container. Getting all this down first prevents having to move things later.
With your specific needs mapped out through pre-planning, you can size the system components correctly and lay out the piping logically. This vital step sets up the entire plumbing installation for your shipping container home’s success.
2. Understanding Local Building Codes and Permits
Shipping container homes must meet local building codes and permitting, just like traditional construction. Research your local regulations, including plumbing codes, to see what you need for your container dwelling.
This avoids costly re-work later. Some areas require specific pipe materials, venting, drainage, hot water equipment, and inspection checkpoints. Know the permit process timeline and costs. Proper permits and inspections ensure code compliance and safety. Factor these into your plumbing installation schedule and budget.
Materials and Tools You’ll Need
The right tools and materials are critical for adequately plumbing a shipping container. Make a detailed list of the essential tools to help you through the project.
Some of the materials and tools you’ll need include:
Tools for Pipework:
- Hacksaw
- Hole saw kit
- Mole grip
- Tubing cutter
- Plumber’s torch
- Thread sealing tape
- Press fitting system
- Pliers
- Bucket
- Ratcheting pipe threader set (optional)
Plumber’s wrenches:
- Pipe wrench
- Adjustable wrench
- Basin wrench
- Internal pipe wrench
- Faucet key
- Torque wrench (optional)
Plumbing drain cleaning tools:
- Plungers
- Snake machine (optional)
- Hand auger
- Hydro jetting machine (optional)
- Drain inspection camera (optional)
Safety tools for plumbers:
- Drain cleaning gloves
- Flashlights
- Goggles
- Heat shields or pads
Research recommendations for durable, resilient plumbing parts designed for shipping container homes specifically. Investing in quality from the start ensures correct functioning and longevity.
3. Preparing the Container for Plumbing
After pre-planning, your focus should shift to preparing the shipping container for the plumbing system. This part needs precision and care so the plumbing fits into your container design smoothly.
Cutting and framing pipe openings takes meticulous measuring and work in this stage. Beyond that, think about insulation and moisture control.
Preventing condensation and mold growth keeps your container living or work space healthy and comfortable. If the container will be mobile, secure the pipes well so they don’t get damaged during transportation.
4. Waste Disposal System
When planning the plumbing for your shipping container home, consider the waste disposal system carefully. Traditional septic, city sewers, or eco-friendly composting toilets are good options. Proper ventilation is critical when installing toilets in a container.
Emphasize environmentally friendly waste disposal to minimize ecological impact—research which waste system best suits your container home’s location and needs. Proper planning ensures you choose an optimal disposal method that functions flawlessly. Having the appropriate waste disposal setup is a crucial part of plumbing in shipping container homes.
5. Hot Water Systems
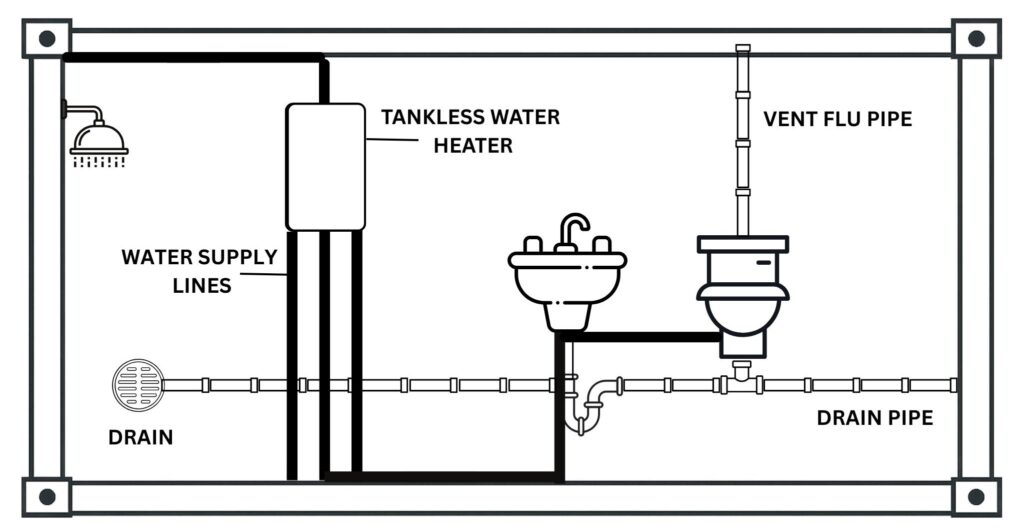
Remember to provide hot water when planning the plumbing for your shipping container home. Consider energy-efficient options like tankless water heaters or solar-powered systems versus regular tank models.
Follow specific installation guidelines for integrating the system smoothly in your container’s compact space. Position it strategically to allow for maintenance access. Optimizing for energy efficiency will ensure the system performs well without over-consuming resources.
With the correct hot water setup, you can enjoy hot water and showers even in an unconventional container dwelling. Properly planning this crucial utility will provide reliable hot water for all your needs.
6. Maintenance and Upkeep
While installing the plumbing system is essential, remember that ongoing maintenance is crucial for longevity. Be sure to regularly check for leaks, wear and tear, clogs, or any other issues that may arise. Catching even minor problems early on can prevent much bigger problems. Regular maintenance and upkeep will help ensure your shipping container home’s plumbing system continues functioning correctly for years.
In cold climates, “winterize” the plumbing to avoid freezing and burst pipes when temperatures drop. Shut off and drain exterior taps and lines. Insulate pipes and add heat trace wire if needed.
Ensure to flush drains to keep them clear of grease and grime buildup. With vigilant maintenance and upkeep, your shipping container home’s plumbing system will stay in good working order for years of comfortable function.
Hiring a Contractor: Tips and Tricks
Hiring a qualified contractor experienced with shipping containers can be invaluable for plumbing and other work. However, before construction even begins, carefully choose your container supplier.
Look for a reliable shipping container supplier that provides high-quality containers for conversion into homes. Many top suppliers now offer pre-modified containers or will customize them to your needs. This streamlines the process and lets you get containers outfitted with basic plumbing in shipping container homes before delivery. Getting optimal shipping containers on the front end will make the plumbing and overall conversion project smoother.
Then, you can focus on hiring the right contractor to execute the specialized plumbing work expertly and efficiently.
Contractor Hiring Tips
Here are some tips and tricks for hiring the right contractor for plumbing work on a shipping container home:
- Find contractors experienced specifically with shipping containers as they understand the unique challenges and how to work in compact spaces.
- Ask to see examples of previous shipping container projects they’ve worked on.
- Make sure they are licensed, bonded, and insured.
- Get multiple quotes to compare pricing and scopes of work.
- Have a detailed contract outlining the exact work, timeline, warranty, and costs. Don’t work with anyone offering vague verbal agreements.
- Check references to confirm they do quality work and have happy customers.
- Ask how they will keep the worksite clean and minimize disruption.
- Inquire about eco-friendly/energy-efficient plumbing options they can provide.
- See if they offer plumbing maintenance plans or service warranties.
- Clarify how change orders and overages will be handled if the scope expands.
- Trust your gut. Find someone you communicate well with and feel confident in.
Star Your Container Transformation Today
You now have the knowledge to install plumbing that transforms a simple shipping container into an innovative, comfortable living or workspace. While DIY is tempting, consider hiring a professional plumber, even if you like doing it yourself. Their expertise and efficiency will elevate your project and make your vision a reality smoothly.
You’ve covered each step of how to install plumbing in a shipping container thoroughly in our guide. Now, it’s time to take action and create your ideal shipping container dwelling. Turn possibilities into reality. Blend form and function to make your unconventional home dreams happen.
The journey awaits–don’t delay! Contact us today to get your shipping container project started. Our team of experts can consult on the plumbing and any other aspects to make your unique container conversion smooth and successful. Let’s discuss your container home goals – your innovative story awaits!


